Cardboard Storage Box
I do believe that I got this idea from Pinterest? Or another similar website. Regardless, I always have a TON of extra shipping boxes for my Etsy account. And rather than have dozens of boxes in a closet, I figured I'd put them to good use.
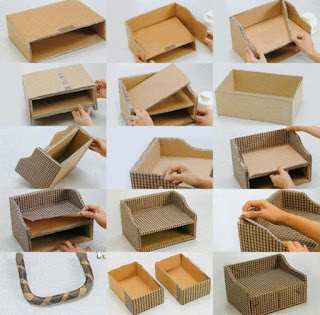
This image was my inspiration, but it was really just that. As you'll soon see, mine is much taller and a bit thinner. I really just used this for a general feel of the project and did my own thing from there. Mine is actually still not finished. Instead of four large drawers, I'll have the two big drawers on the right side, and then four smaller drawers going up the left side.
Anyway, though, I'm going to sort of walk you through how I made my box and hopefully it gives you a bit of direction for making your own! Even though I used my own shipping boxes, you can take any kind of cardboard, really, and cut and tape it into the size that you need.

If you want to make it sturdier around the top, you can cut and add a layer of cardboard to the inside parts. The inner edge pieces and the top of the shelf itself, to create a stronger surface. I did this with mine, but didn't add another piece to the back since it will be sitting on my desk against the wall.

This is the general idea for the drawers. You'll need a long piece that fits from the front to the back of the shelf. You'll need two side pieces for however tall you want the shelf, and you'll need a front and back piece of the same height. You'll need this same pattern for as many drawers you'll be making. The only thing that might change is if you're making different sizes. Then you'll need different heights and/or widths.


This image was my inspiration, but it was really just that. As you'll soon see, mine is much taller and a bit thinner. I really just used this for a general feel of the project and did my own thing from there. Mine is actually still not finished. Instead of four large drawers, I'll have the two big drawers on the right side, and then four smaller drawers going up the left side.
Anyway, though, I'm going to sort of walk you through how I made my box and hopefully it gives you a bit of direction for making your own! Even though I used my own shipping boxes, you can take any kind of cardboard, really, and cut and tape it into the size that you need.
THE SHELF
So, this is the first thing that I really did. I took one box and closed up the end and opened up another box and wrapped around the back. This will create the upper rim of your shelf. I also cut off the flaps on the side facing me to have a thinner shelf. So just glue the opened box snugly around your formed box and you'll have the first step done!
If you want to make it sturdier around the top, you can cut and add a layer of cardboard to the inside parts. The inner edge pieces and the top of the shelf itself, to create a stronger surface. I did this with mine, but didn't add another piece to the back since it will be sitting on my desk against the wall.
DRAWERS
From there, you'll want to make drawers. It's really easy to make the drawers. Since I didn't do/use any measurements, you'll basically need to eye it and cut to fit as you go. Unless you want to measure, which is great! This is really just meant to be a tutorial to give you an idea on how to make your own box-shelf.
 |
| The "handle" is a small piece of cardboard glued to the edge of the drawer. |

This is the general idea for the drawers. You'll need a long piece that fits from the front to the back of the shelf. You'll need two side pieces for however tall you want the shelf, and you'll need a front and back piece of the same height. You'll need this same pattern for as many drawers you'll be making. The only thing that might change is if you're making different sizes. Then you'll need different heights and/or widths.
 |
| Tape on the inside for more stability |
You can either use hot-glue or tape or you can use a mix of both like I did. I did a drop of hot glue on each edge and in the middle and held them together, and then I used tape on the outside and inside. Since nothing heavy will really be going into mine, I don't need a super sturdy drawer. It's made of cardboard, guys, so don't expect it to hold up to extremely heavy objects.

For layered drawers (which you'll be doing if your shelf is taller), you'll need to place a little shelf inside the box so a drawer can sit on another drawer.
 |
| Make sure you drawer slides smoothly in and out. |
For this, it's really simple. You'll just take the cardboard cut to the SAME WIDTH as your initial drawer (like my pink one there) and place it above the drawer. Don't place it tight against the drawer or you won't be able to get the drawer out in the future. Place it slightly above it so the drawer still slides smoothly out of it's little cubby. You need to glue and tape that piece down.
Cut another piece of cardboard that is the SAME HEIGHT as your drawer (see my pink one there), and attach it to the piece that you just glued in. You can use bits of glue like I suggested for gluing the drawer together, and then adding tape for a little more strength. Like I said, it's really easy. If you have questions, though, leave a comment and I'll help you out.

For my second drawer (the patterned one on top) I did exactly the same thing that I did before. I cut everything to size and glued/taped it together. It goes in and out smoothly, but snug enough that it won't fall open if I tipped my shelf forward. For the second side, there, I'm doing four smaller drawers. Since I'm using this in our home office, I don't need four large drawers. Two large and four small ones will do quite nicely for my needs.

This is the smaller shelf, which also follows the same pattern. The only thing that I did differently was cut the side pieces and front and back pieces shorter.


In this picture here you can see that I added another piece of cardboard above the drawer just as I did for my first drawer. It sits above it enough that my drawer slides in and out, but not so snug that it's difficult to remove. I'll be doing this same pattern for the other three, smaller drawers.
TRIM

I added a bit of trim around the edges of the entire shelf. It gives it a nicer, cleaner look than the exposed inner pieces of the cardboard.

Just cut several thin pieces from your cardboard box. They don't have to be exact since you can always trim them later.

You can see in these pictures that I didn't get the trim the correct size, but that's perfectly fine. If your scissors will fit, cut along the edge to trim off the excess. If they won't fit, carefully use a utility knife or hobby knife.

Here you can see all the places I'll added the trim. Oh, you can also see my wonderful coffee mug! (Thank you, Dollar Tree on Parker) I think the trim gives it a cleaner look. In original image I used for inspiration, their box was thicker so the trim was more needed. If you don't want to mess around with cutting and gluing the trim, you can always use a nice paper tape for a trim. That was actually my original intention and is still my intention once I make it to the store.
You can also see that I've added coloured paper to the boxes and the inner top shelf. I also did the outer sides, but that's not pictured. Just take a glue stick and rub it literally all over the area you're about to paper. Lay the paper and cut it. For the inner parts, you'll definitely need to cut it to size for gluing it. It'll be difficult to glue it and then cut it, and will most likely just result in a crumpled mess of sticky paper.
I really hope you enjoyed this (tutorial?) post and that it gave you some ideas on how to recycle your own cardboard boxes. I know you can take them to a recycling center, but to me there's no point. I needed a little shelf with drawers for my office supplies, so I made one rather than buying one.
ENVIRONMENTAL VENI
Comments
Post a Comment