How it's Still Okay to Use Plastic Instead of Paper
It's an age old question (kidding, I know): Paper or plastic?
If you've read my other posts, you'll have seen that my husband doesn't care for the paper bags as they're awkward to carry. For him this just means he can't carry all of the groceries to the house in one trip.
Sometimes, though, you don't have an option. If you're like us, you forget your cloth bags on almost every single trip. I know we need to put them in the car, but we forget. Since we mostly shop at kroger, it's not usually an issue. On the rare occasion that we go to Walmart, we usually don't get enough to need bags. But if we do, I feel terrible. I recently saw a video, though, that makes me feel much less anxious about bringing home plastic bags.
You'll really only need three things.
*Scissors
*A Clothing Iron
*All the plastic bags
*Parchment paper
You'll notice that I have not used my own images. My camera is missing the cord and my husband refuses to let me borrow his cell phone (I don't have one) so that I can transfer my cam SD card into it and transfer the photos. But it will happen soon! Until then I've borrowed images and given credit where it's due. So I hope that's alright!
You're going to start by laying the bags flat and smoothing them out. Try smoothing them out in a way that the edges are folded back in so that they look like new bags again (minus the wrinkles, of course).

This image is from the youtube channel اسهل طريقة لترتيب الاكياس البلاستيك فى المطبخ
Once that's done, you'll need to cut off the handles and the bottom seam. Don't cut off much more than just the bottom seam. Now you can spread the bags out completely flat. They should resemble handleless bags with no bottom. I hope my pictures make it easier to understand, since I'm horrible with explaining things.

This image is from http://www.madeeveryday.com/2008/07/tutorial-recycled-grocery-totes.html/
It's a different tutorial that uses sewing, but definitely worth checking out!
Once you've done that, layer the bags four at a time. Keeping only four bags layered, lay a sheet of parchment paper on top and iron the bags together. You want to make sure that the bags are firmly melted together. This will create a much sturdier bag. You're welcome to layer more than four together, but I find four to be strong enough for our purchases.

This image is from the youtube channel Howcast
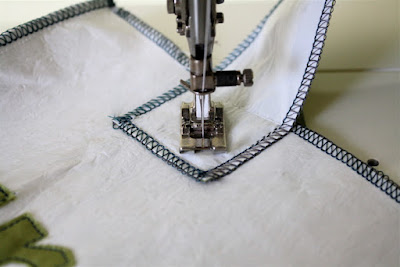
Now you'll want to take two freshly ironed sheets and lay them on top of each other. Take your parchment paper and iron ONLY THREE EDGES. Do not iron the entire thing, and make sure to leave one side open for the top of the bag. At this point, you've got your bag made. But to make it easier to use, we're going to make handles for it.


These images are from http://www.madeeveryday.com/2008/07/tutorial-recycled-grocery-totes.html/
As you can see, these are being sewn together but the idea is exactly the same. Instead of sewing, you'll be ironging the edges with the parchment paper on top of the edges before you iron them.
Take the handles you've cut off and lay them flat. Layer them four to a handle and put the parchment paper over them. Then melt them together the same way you did with the bags. Once that's done, turn the bag where the opening faces you. Center the newly made handle and lay each edge, well, where a handle would go. You'll need to take your parchment paper again and lay over the edge you've laid inside the edge of the opening. Iron both edges and do this same process for the other side. You'll do this same process for each bag that you've made so that they all have handles.


These images are borrowed from http://www.madeeveryday.com/2008/07/tutorial-recycled-grocery-totes.html/
You can see that they are sewn together, but it's the EXACT same idea. You'll just be laying down parchment paper and ironing it instead of sewing it.
I will be adding my own images, but have currently borrowed (and given credit) to images that I got from Google search.
I do hope you've enjoyed this tutorial. I actually learned it because of a video on Facebook. Some people may argue that it's better to not use plastic entirely, but I have a husband and two roommates. So this was a better option for our house, since I can't control what others do. But I CAN take the bags and do with them as I please. (:
If you've read my other posts, you'll have seen that my husband doesn't care for the paper bags as they're awkward to carry. For him this just means he can't carry all of the groceries to the house in one trip.
Sometimes, though, you don't have an option. If you're like us, you forget your cloth bags on almost every single trip. I know we need to put them in the car, but we forget. Since we mostly shop at kroger, it's not usually an issue. On the rare occasion that we go to Walmart, we usually don't get enough to need bags. But if we do, I feel terrible. I recently saw a video, though, that makes me feel much less anxious about bringing home plastic bags.
You'll really only need three things.
*Scissors
*A Clothing Iron
*All the plastic bags
*Parchment paper
You'll notice that I have not used my own images. My camera is missing the cord and my husband refuses to let me borrow his cell phone (I don't have one) so that I can transfer my cam SD card into it and transfer the photos. But it will happen soon! Until then I've borrowed images and given credit where it's due. So I hope that's alright!
You're going to start by laying the bags flat and smoothing them out. Try smoothing them out in a way that the edges are folded back in so that they look like new bags again (minus the wrinkles, of course).

This image is from the youtube channel اسهل طريقة لترتيب الاكياس البلاستيك فى المطبخ
Once that's done, you'll need to cut off the handles and the bottom seam. Don't cut off much more than just the bottom seam. Now you can spread the bags out completely flat. They should resemble handleless bags with no bottom. I hope my pictures make it easier to understand, since I'm horrible with explaining things.

This image is from http://www.madeeveryday.com/2008/07/tutorial-recycled-grocery-totes.html/
It's a different tutorial that uses sewing, but definitely worth checking out!
Once you've done that, layer the bags four at a time. Keeping only four bags layered, lay a sheet of parchment paper on top and iron the bags together. You want to make sure that the bags are firmly melted together. This will create a much sturdier bag. You're welcome to layer more than four together, but I find four to be strong enough for our purchases.

This image is from the youtube channel Howcast
Now you'll want to take two freshly ironed sheets and lay them on top of each other. Take your parchment paper and iron ONLY THREE EDGES. Do not iron the entire thing, and make sure to leave one side open for the top of the bag. At this point, you've got your bag made. But to make it easier to use, we're going to make handles for it.


These images are from http://www.madeeveryday.com/2008/07/tutorial-recycled-grocery-totes.html/
As you can see, these are being sewn together but the idea is exactly the same. Instead of sewing, you'll be ironging the edges with the parchment paper on top of the edges before you iron them.
Take the handles you've cut off and lay them flat. Layer them four to a handle and put the parchment paper over them. Then melt them together the same way you did with the bags. Once that's done, turn the bag where the opening faces you. Center the newly made handle and lay each edge, well, where a handle would go. You'll need to take your parchment paper again and lay over the edge you've laid inside the edge of the opening. Iron both edges and do this same process for the other side. You'll do this same process for each bag that you've made so that they all have handles.


These images are borrowed from http://www.madeeveryday.com/2008/07/tutorial-recycled-grocery-totes.html/
You can see that they are sewn together, but it's the EXACT same idea. You'll just be laying down parchment paper and ironing it instead of sewing it.
I will be adding my own images, but have currently borrowed (and given credit) to images that I got from Google search.
I do hope you've enjoyed this tutorial. I actually learned it because of a video on Facebook. Some people may argue that it's better to not use plastic entirely, but I have a husband and two roommates. So this was a better option for our house, since I can't control what others do. But I CAN take the bags and do with them as I please. (:

Comments
Post a Comment